快速上手
Step1
我们先使用 命令行工具 命令行初始化项目
>>> fitlog init example
Initialized empty Git repository in /Users/fdujyn/workspaces/example/.git/
[master (root-commit) 0b94c29] Project initialized.
 4 files changed, 72 insertions(+)
 create mode 100755 .fitconfig
 create mode 100755 .gitignore
 create mode 100644 logs/default.cfg
 create mode 100755 main.py
Initialized empty Git repository in /Users/fdujyn/workspaces/example/.git/
Fitlog project example is initialized.
进入项目文件夹后,我们可以看到文件夹下已经初创建了若干文件夹。其中,以`.`开头的文件和文件夹是fitlog所需的配置文件, 我们一般情况下不需要修改他们;logs 文件夹是 fitlog 默认存放日志的文件夹;main.py 是训练程序的入口文件。
>>> cd example
>>> ls -al
total 24
drwxr-xr-x   8 fdujyn  staff  256 Apr 25 19:38 .
drwxr-xr-x@ 20 fdujyn  staff  640 Apr 25 19:38 ..
-rwxr-xr-x   1 fdujyn  staff  142 Apr 25 19:38 .fitconfig
drwxr-xr-x  14 fdujyn  staff  448 Apr 25 19:38 .fitlog
drwxr-xr-x  10 fdujyn  staff  320 Apr 25 19:40 .git
-rw-r--r--   1 fdujyn  staff   37 Apr 25 19:38 .gitignore
drwxr-xr-x   3 fdujyn  staff   96 Apr 25 19:38 logs
-rwxr-xr-x   1 fdujyn  staff  390 Apr 25 19:38 main.py
Step2
我们简单地将 main.py 修改为一个类似训练过程的代码,loss 和 acc 是随机生成的。我们把随机种子 rand_seed 看做超参数, 如果rand_seed确定,那么loss 和 acc 关于 step 的函数就是确定的。我们可以选择几组不同的 rand_seed 进行调参,寻找较好的 acc。 fitlog 的其它函数用法参见 用户 API
import fitlog
import random
import argparse

# 从命令行传入参数
parser = argparse.ArgumentParser()
parser.add_argument('--demo', type=int, default=2)

# fitlog.commit(__file__)             # 自动 commit 你的代码
fitlog.set_log_dir("logs/")         # 设定日志存储的目录

args = parser.parse_args()
fitlog.add_hyper(args)  # 通过这种方式记录ArgumentParser的参数
fitlog.add_hyper_in_file(__file__)  # 记录本文件中写死的超参数

######hyper
rand_seed = 124
######hyper

random.seed(rand_seed)
best_acc, best_step, step = 0, 0, 0

for i in range(200):
    step += 1
    if step % 20 == 0:
        loss = random.random()
        acc = random.random()
        fitlog.add_loss(loss,name="Loss",step=step)
        fitlog.add_metric({"dev":{"Acc":acc}}, step=step)
        if acc>best_acc:
            best_acc = acc
            fitlog.add_best_metric({"dev":{"Acc":best_acc}})
            # 当dev取得更好的performance就在test上evaluate一下
            test_acc = random.random()
            fitlog.add_best_metric({"test":{"Acc":test_acc}})
fitlog.finish()                     # finish the logging
我们 rand_seed 分别设为 12, 123, 1234, 12345 进行四次实验,然后就是打开网页服务查看实验结果了。
Step3
我们在项目目录下使用命令行工具开启 fitlog 网页服务:
>>> pwd
/Users/fdujyn/workspaces/example
>>> fitlog log logs
Start preparing data.
Finish preparing data. Found 4 records in /Users/fdujyn/workspaces/example/logs.
 * Serving Flask app "fitlog.fastserver.app" (lazy loading)
 * Environment: production
   WARNING: Do not use the development server in a production environment.
   Use a production WSGI server instead.
 * Debug mode: off
 * Running on http://0.0.0.0:5000/ (Press CTRL+C to quit)
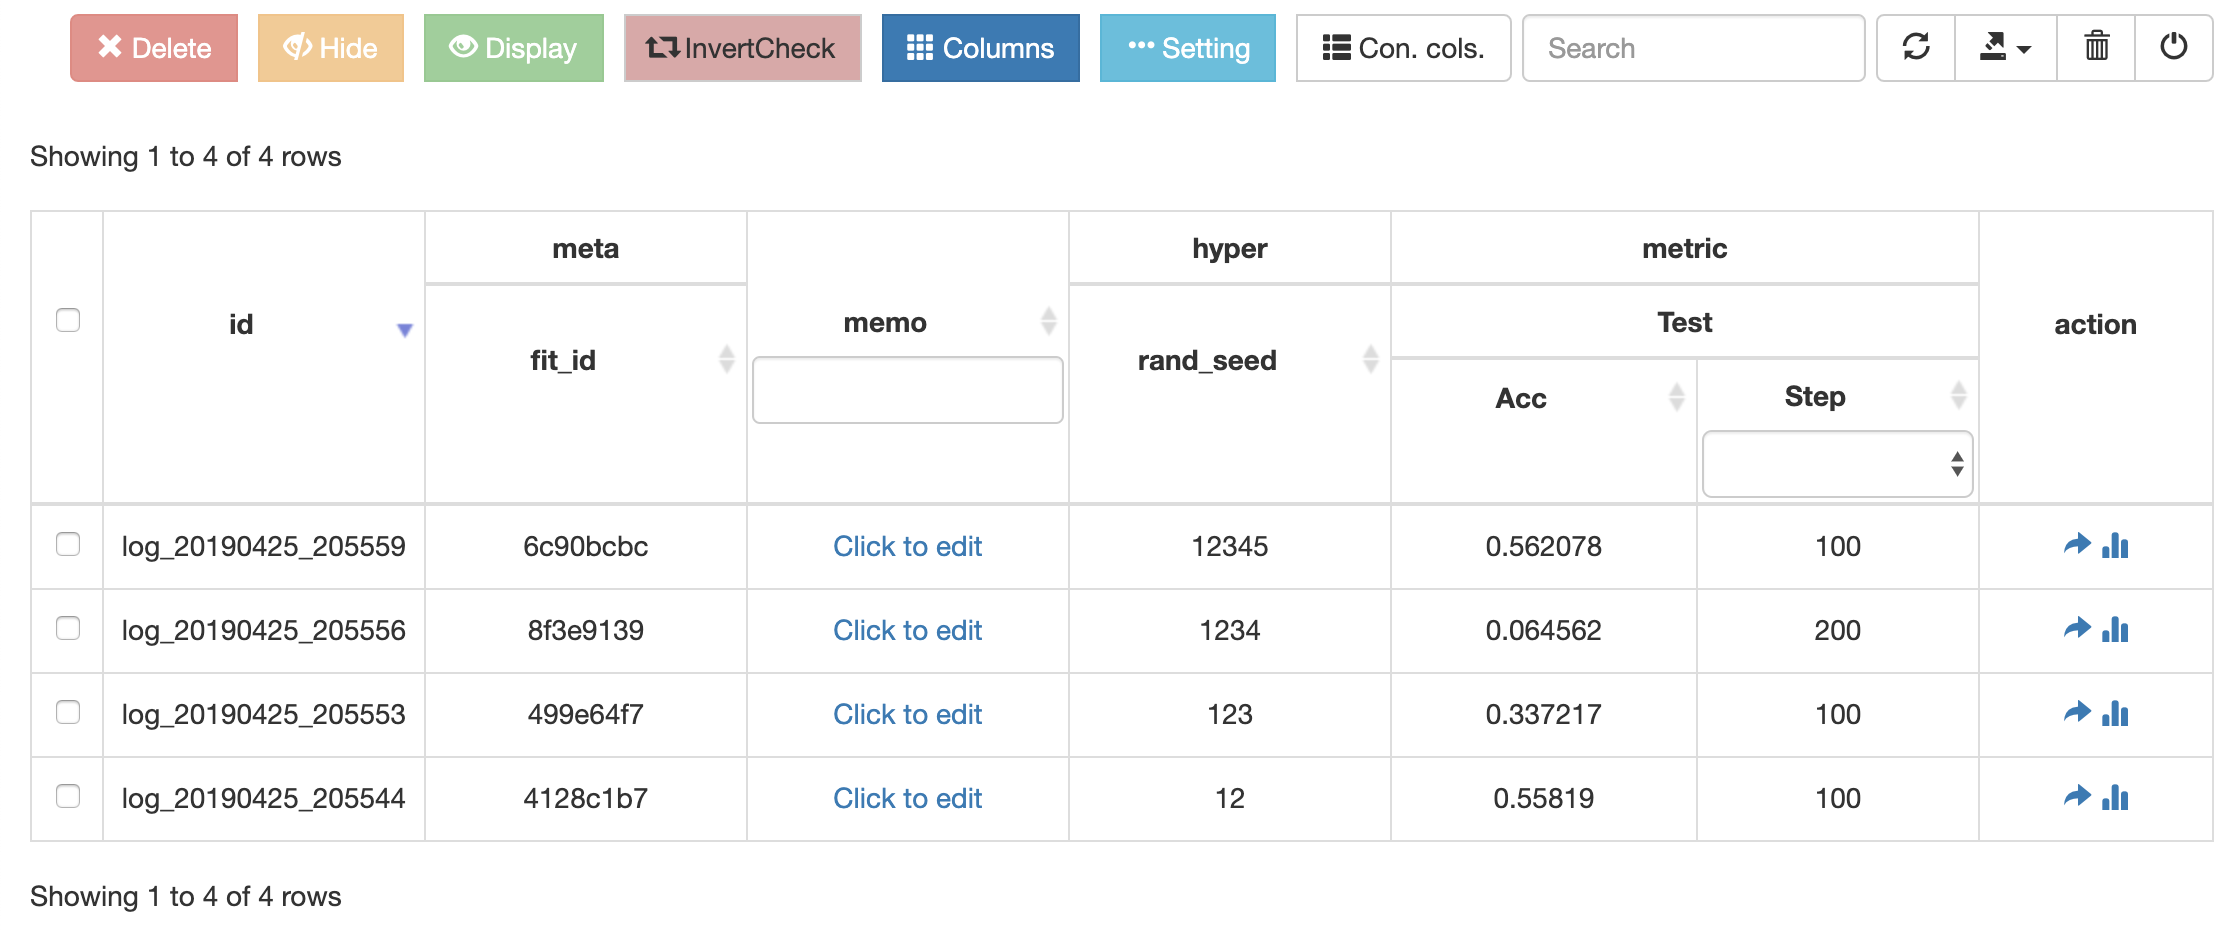
如下图所示,我们可以看到这四次实验的记录,其中 fit_id 是 fitlog 帮你自动 commit 的 id,后面几列是实验的超参数和实验的最优结果。
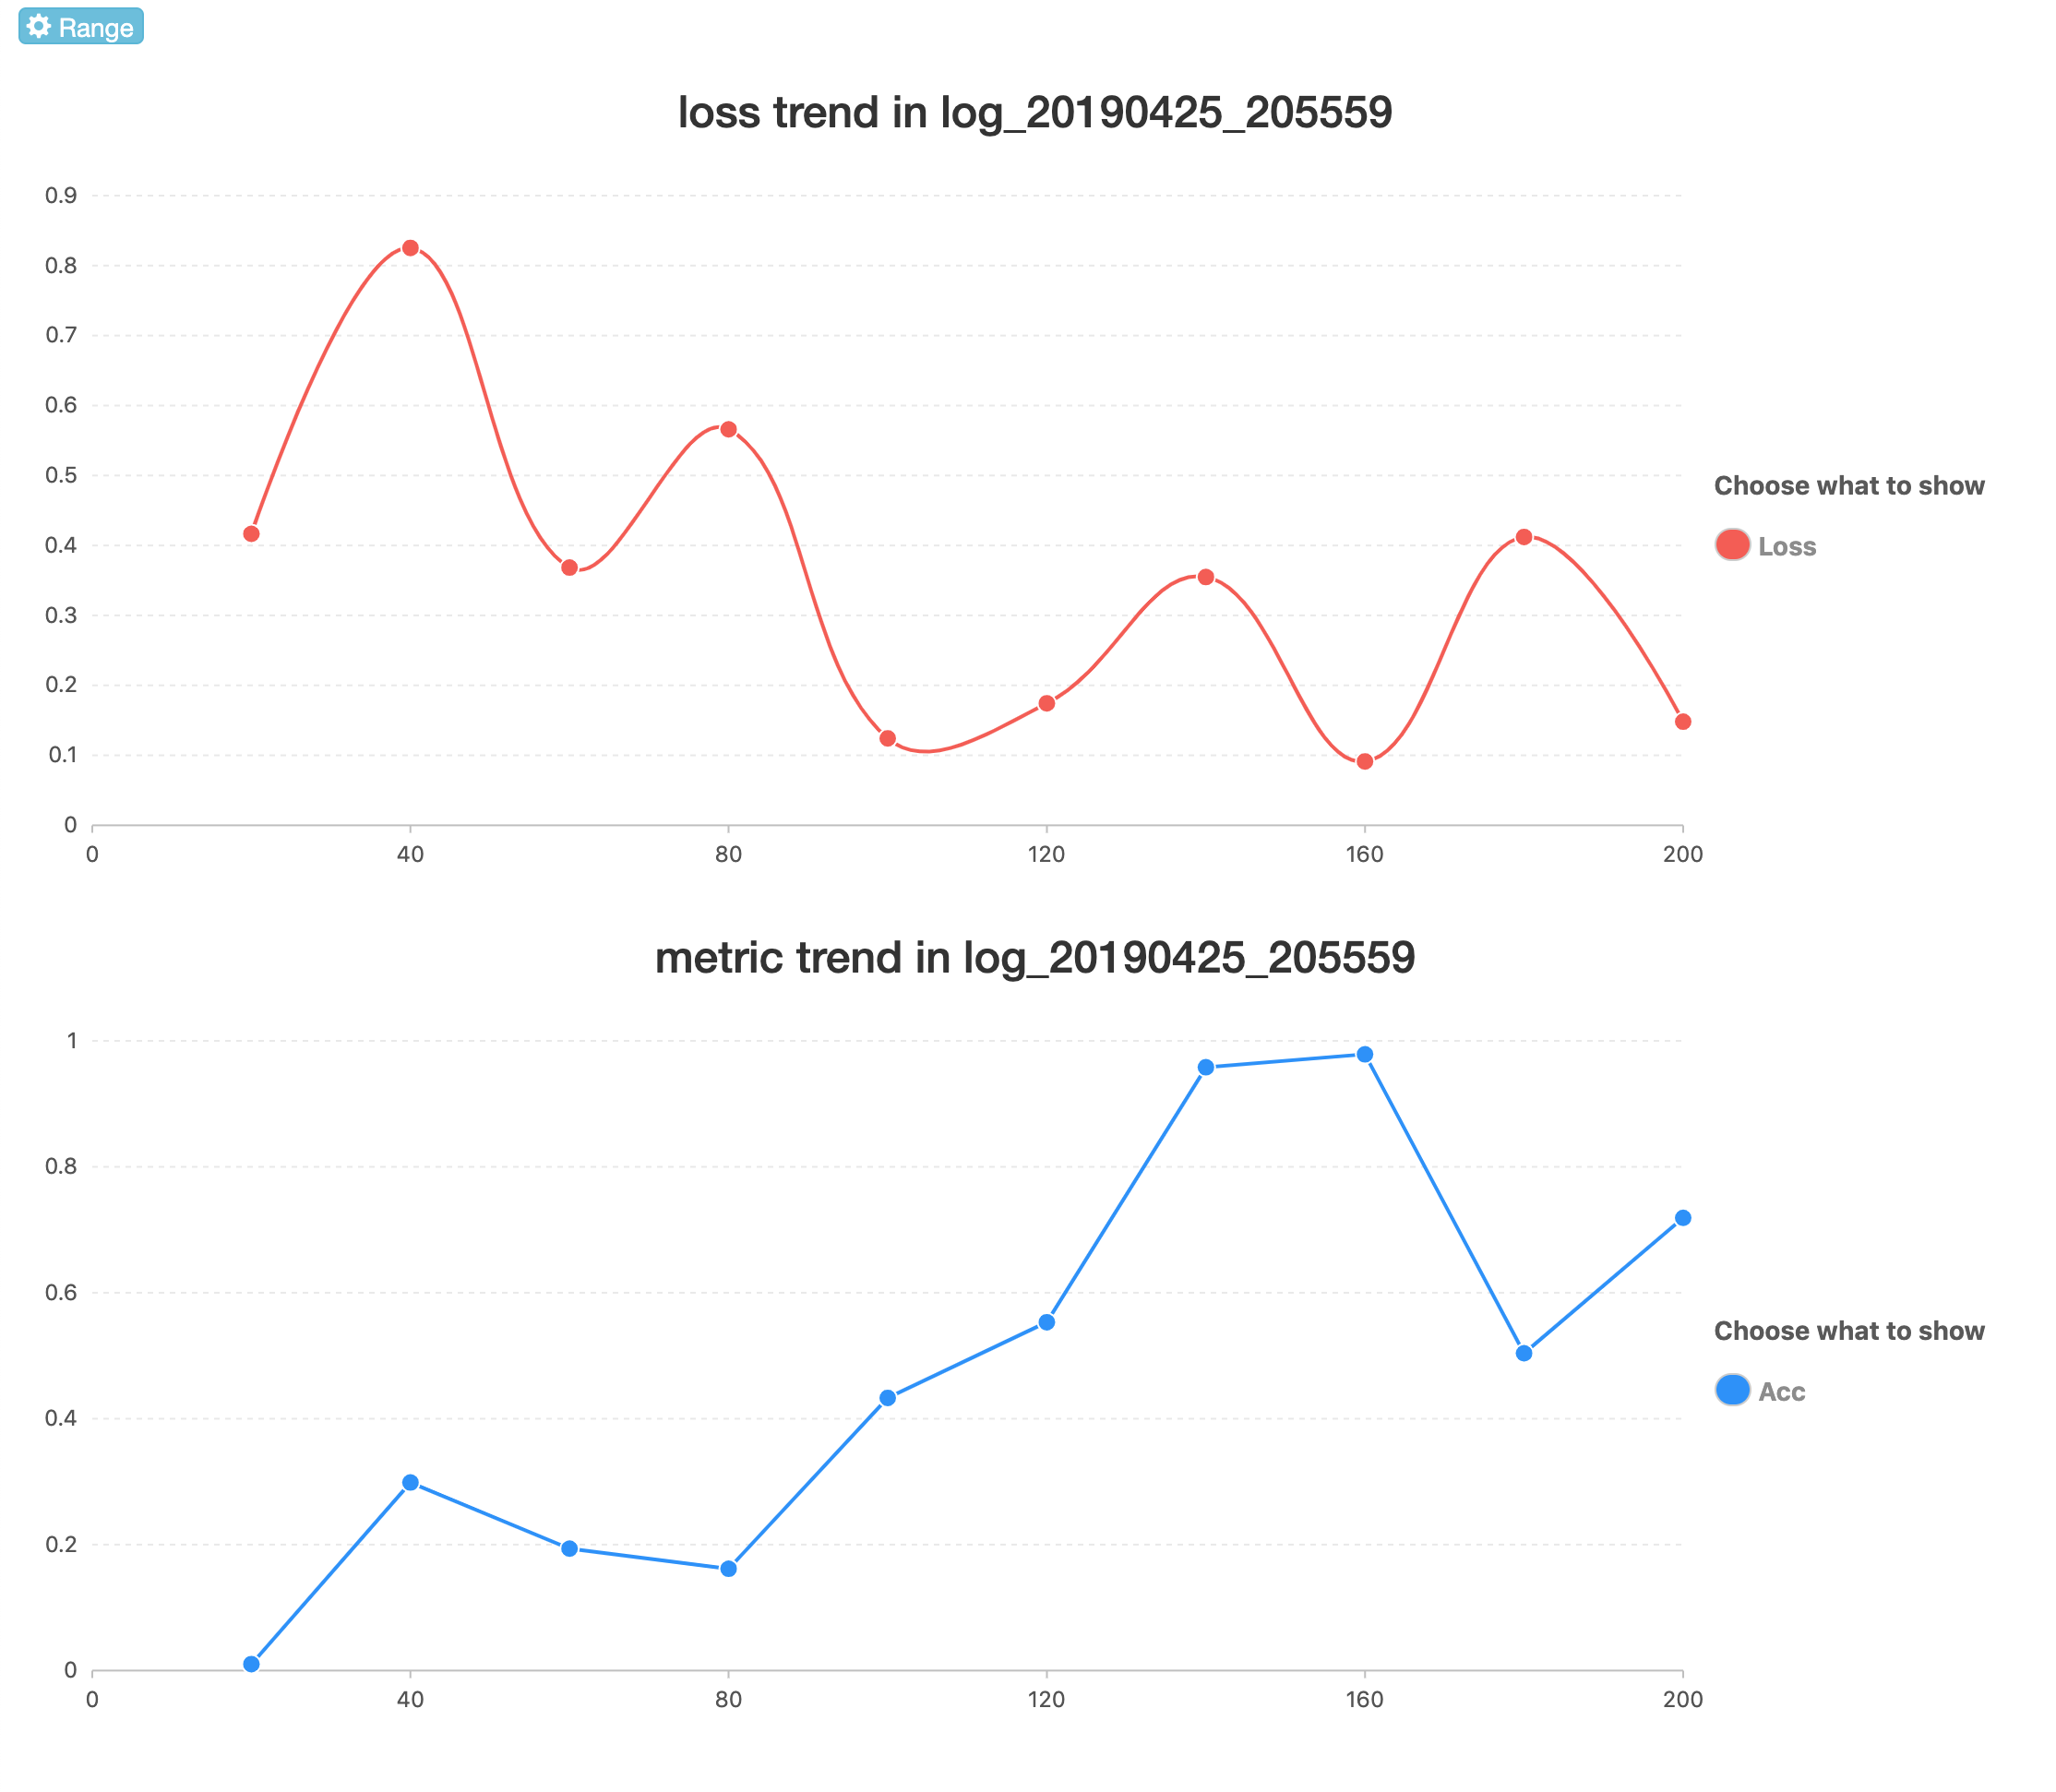
我们可以点开最后一列的图标符号看到 loss 和 acc 的详细变化图:
fitlog 网页服务的详细用法参见 网页服务